
This post is a simple and quick guide to deploy Splunk SmartStore on Pure Storage’s FlashBlade object-store. This is the guide I follow all the time when I want to deploy Splunk for testing in our internal lab. This guide is applicable to Splunk versions from 7.3 to the latest version 8.2.3.
Word of caution: This deployment guide is not production-grade and might not be following the best practices suggested by Splunk and might not meet all your Organization’s security/operational requirements. Hence use it as you deem appropriate.
1. Overview
The Splunk SmartStore Deployment includes 6 servers, 1 FlashBlade in a single site set up.
- 1 Cluster Manager (will also act as License Server & Monitoring Console)
- 4 Indexers in Indexer Cluster mode
- 1 Search head
- Hot/Cache is set up on local DAS (NVMe)
- Warm Tier is set up on FlashBlade over S3

2. Server Setup
2.1 OS Install
Install CentOS 8 on all the hosts and assign the IP addresses.
2.2 Post OS install configuration
2.2.1 Update /etc/hosts file on the Cluster Manager (splunk-cm01)
10.xx.xx.xx splunk-cm01  # Cluster Manager
10.xx.xx.xx splunk-ix01  # Indexer
10.xx.xx.xx splunk-ix02  # Indexer
10.xx.xx.xx splunk-ix03  # Indexer
10.xx.xx.xx splunk-ix04  # Indexer
10.xx.xx.xx splunk-sh01  # Search Head
2.2.2 Install & Configure ClusterShell
Clustershell is a utility used to issue commands to a set of servers in parallel. This will help in speeding up the deployment process rather than running those commands on every server serially. We will install this on the Cluster Manager (CM) as it will behave as the manager node for running all these commands.
First, install EPEL repository on the Cluster Manager server.
wget https://dl.fedoraproject.org/pub/epel/epel-release-latest-7.noarch.rpm
rpm -hiv epel-release-latest-7.noarch.rpm
Install ClusterShell utility by running the following command
yum install clustershellConfigure the group details for the cluster shell by editing the following file (/etc/clustershell/groups) with the node details.
[root@splunk-cm01 ~]# more /etc/clustershell/groups
all: splunk-cm01,splunk-ix[01-04],splunk-sh01
ix: splunk-ix[01-04]
sh: splunk-sh01
Setup passwordless SSH between the Cluster Manager (splunk-cm01) and all other hosts
Run ssh-keygen on Cluster Manager to generate the public and private keys as root user (required to perform any root level activities like applying packages, setting limits etc).
[root@splunk-cm01]# ssh-keygen
Generating public/private rsa key pair.
Enter file in which to save the key (/root/.ssh/id_rsa):
Enter passphrase (empty for no passphrase):
Enter same passphrase again:
Your identification has been saved in /root/.ssh/id_rsa.
Your public key has been saved in /root/.ssh/id_rsa.pub.
The key fingerprint is:
SHA256:UQ0dEuamUVKKX5jDmoyY/dp/E8BEVdqdzGbRhssn8zk root@splunk-s2
The key's randomart image is:
+---[RSA 2048]----+
|       .ooX*o..o |
|       o.X +o+.oo|
|      .oO = ..Bo |
|   + o +oB   o= .|
|  o o + S.     =.|
|     .    .    E.|
|      .    .    .|
|     o    o      |
|    . .... .     |
+----[SHA256]-----+
Now copy the public key to all the Splunk servers using the following script.
# for host in splunk-cm01 splunk-ix01 splunk-ix02 splunk-ix03 splunk-ix04 splunk-sh01;
do
  echo -n "$host -> ";
  ssh-copy-id -i ~/.ssh/id_rsa.pub $host;
done
Verify the clustershell setup is working by running the following command.
[root@splunk-cm01]# clush -a hostnameUpdate the /etc/hosts on all the Splunk servers with that of cluster manager so every server can be accessed through the hostnames without any issues. If this is not set up, connecting from indexer/search head to the Cluster Manager will fail.
[root@splunk-cm01]# clush -a -x splunk-cm01 -c /etc/hosts --dest /etc2.2.3 Prerequisite packages
Following are some of the suggested/recommended packages for Indexers as they will be hosting Hot/Cache.
- On-prem
- NFS mounts: nfs-utils (In case using FlashBlade NFS filesystems for Cold tier)
- SCSI generic: sg3_utils (In case of using SCSI devices)
- Multipath: device-mapper-multipath (In case of using enterprise storage array like FlashArray)
- Chrony: Time synchronization (Required on all Splunk servers)
To install them from Cluster Manager on the indexers, perform the following as the root user.
clush -g ix "yum install nfs-utils -y"
clush -g ix "yum install net-tools -y"
clush -g ix "yum install sg3_utils -y"
clush -g ix "yum install device-mapper-multipath -y"
clush -g ix "yum install chrony -y"
2.2.4 Time synchronization
Enable time synchronization across all hosts using NTP. CentOS 8 by default has chronyd services enabled. If you have a local NTP server, update /etc/chrony.conf with the server details. Start the chronyd services if it is not running after updating /etc/chrony.conf file.
# Use public servers from the pool.ntp.org project.
# Please consider joining the pool (http://www.pool.ntp.org/join.html).
server prod-ntp1.puretec.purestorage.com iburst  # Change this to the NTP server
server 0.centos.pool.ntp.org iburst
server 1.centos.pool.ntp.org iburst
server 2.centos.pool.ntp.org iburst
server 3.centos.pool.ntp.org iburst
Validate the time across all servers by running the following command
[root@splunk-cm01]# clush -a dateIf the timezone is not set correctly, use timedatectl to fix it to the timezone your organization requires.
timedatectl set-timezone America/Los_Angeles
# clush -g ix "timedatectl set-timezone America/Los_Angeles"
# clush -a date
2.2.5 Miscellaneous setup
Following are some of the additional set ups that are not a hard requirement.
Disable SELINUX on all servers by updating /etc/selinux/config file.
sed -i 's/SELINUX=enforcing/SELINUX=disabled/g' /etc/selinux/config
setenforce 0
Disable Firewall on all servers
systemctl stop firewalld
systemctl disable firewalld
Enable syslog
Enable syslog on all nodes to preserve logs for any failed jobs.
rsyslogd -v
systemctl status rsyslog
Set limits
Update the nofile property in /etc/security/limits.conf file to enable the inodes that can be opened simultaneously. Default is 1024.
root    soft    nofile  64000
root    hard    nofile  64000
Set TCP retries
Update /etc/sysctl.conf with the tcp_retries entry.
[root@splunk-admin1 ~]# vi /etc/sysctl.conf
[root@splunk-admin1 ~]# sysctl -p
net.ipv4.tcp_retries2 = 5
Disable ipv6 (without this, we had issues connecting to the server after reboot. Had to restart network services manually)
net.ipv6.conf.all.disable_ipv6 = 1
net.ipv6.conf.default.disable_ipv6 = 1
net.ipv6.conf.lo.disable_ipv6 = 1

systemctl restart network.service
Disable Transparent Huge Pages
echo never > /sys/kernel/mm/transparent_hugepage/enabled
echo never > /sys/kernel/mm/transparent_hugepage/defrag
To make the above changes permanent, update /etc/rc.d/rc.local file with the above commands.
3. Storage setup
3.1 Storage for Splunk Binary
Create 50GB volume/lun to host the Splunk software on all the servers including Cluster Manager, Indexers and Search Head.
Create the partition on that volume (using parted), create ext4 filesystem (mkfs -t ext4) on top of it and mount it as /s01 on all servers.
Note: Setup a separate volume/lun for the Splunk software on all the servers and don’t share the same volume across the servers.
root@splunk-cm01:~# df -h /s01
Filesystem Size Used Avail Use% Mounted on
/dev/sdb1 50G 4.7G 46G 10% /s01
3.2 Storage for Hot/Cache & Warm tier
Create a volume for Hot/Cache Tier for all indexers using the available SSD/NVMe drives.
Create the partition on the volume on each indexer using parted, create an ext4 file system and mount them as /cache on all indexers.
Create a directory named splunk under /cache across all indexers.
[root@splunk-cm01 ~]# clush -g ix mkdir -p /cache/splunk3.3 Storage for Warm tier on Object Storage
Create a S3 bucket named splunk-data on the FlashBlade using GUI or CLI.
Save the access key and secret key to be used in step 5.1.4.
4. Splunk Software Setup
4.1 Splunk Installation
4.1.1 Source Splunk software
Download the Splunk software from the Splunk website and place it on the Cluster Manager (CM) at /root directory. The following command copies the Splunk software from CM to all the servers in the group excluding the CM. (As of this post, Splunk 8.2.2 was the version available. Feel free to download the latest version as applicable.)
[root@splunk-cm01 ~]# clush -a -x splunk-cm01 -c /root/splunk-8.2.2-87344edfcdb4-Linux-x86_64.tgz --dest /root4.1.2 Install Splunk software
Install the software on all the hosts by untarring them onto the /s01 directory with the current user’s permissions (user id, group id). Ensure the Splunk binary is in the path by setting the following in the bash_profile across all hosts.
export SPLUNK_HOME=/s01/splunk
export PATH=$PATH:$SPLUNK_HOME/bin

[root@splunk-cm01 ~]# clush -a tar -xvzf /root/splunk-8.2.2-87344edfcdb4-Linux-x86_64.tgz --no-same-owner -C /s01
Prior to starting Splunk, create the following file (user-seed.conf) first on CM and then copy them across all hosts to set up the admin user’s password. For simplicity sake, we have set up the admin password to splunk123. Please change the password as per your SOP.
[root@splunk-cm01 ~]# vi /s01/splunk/etc/system/local/user-seed.conf
[user_info]
USERNAME = admin
PASSWORD = splunk123

[root@splunk-cm01 ~]# clush -a -x splunk-cm01 -c /s01/splunk/etc/system/local/user-seed.conf --dest /s01/splunk/etc/system/local/
Splunk 8.2 by default enables license, support usage, software version data and aggregated data usage to be sent to Splunk. If you want to opt out of data usage, follow the option in
In the CM, create the file $SPLUNK_HOME/etc/system/local/telemetry.conf and include the following content. Copy them to all the servers using the clush command.
[general]
sendAnonymizedUsage = false
sendAnonymizedWebAnalytics = false
sendLicenseUsage = false
sendSupportUsage = false
precheckSendAnonymizedUsage = false
precheckSendLicenseUsage = false
precheckSendSupportUsage = false

[root@splunk-cm01 ~]# clush -a -x splunk-cm01 -c /s01/splunk/etc/system/local/telemetry.conf --dest /s01/splunk/etc/system/local/
4.2 Start Splunk instances
4.2.1 Start Splunk software
Start Splunk on all hosts without any prompts.
[root@splunk-cm01 ~]# clush -a /s01/splunk/bin/splunk start --answer-yes --no-prompt --accept-license4.2.2 Setup the License server
Setup the license on the license server (in our case cluster manager will also act as the license server) by logging into the server. http://splunk-cm01:8000 and enter username and password (admin/splunk123).
Note: You might have to update your /etc/hosts in your laptop or the server from where you are trying to connect to the GUI of Splunk with the IP address of the splunk-cm01.


Click Add license, specify the license file and restart Splunk on the license server (splunk-cm01).

Now, update all the other hosts to point to the license server by running the following command.
Make sure all servers can reach the splunk-cm01 server. Make sure all the servers can resolve to the Cluster Manager by either using /etc/hosts or DNS services.
[root@splunk-cm01 ~]# clush -a -x splunk-cm01 /s01/splunk/bin/splunk edit licenser-localslave -master_uri https://splunk-cm01:8089 -auth admin:splunk123Note: The master_uri is being replaced by manager_uri in the latest Splunk releases.
Restart all servers except the Cluster Manager (license server).
[root@splunk-cm01 ~]# clush -a -x splunk-cm01 /s01/splunk/bin/splunk restartTo verify all nodes are pointing to the License server for licensing, click Settings=>Licensing=>Connected Indexers and make sure the count shows 6 for six servers including the Cluster Manager.
Indexers connected to: splunk-cm01 (6)
5 Setup Indexer Clustering
5.1 Configuration files required on Cluster Manager
Setup the following files in the Cluster Manager server (splunk-cm01) alone and not on any other servers. (Only exception is outputs.conf should be setup additionally on both search heads)
inputs.conf
server.conf
outputs.conf
indexes.conf
5.1.1 inputs.conf
Create a new file named inputs.conf with the following contents in $SPLUNK_HOME/etc/master-apps/_cluster/local directory
vi $SPLUNK_HOME/etc/master-apps/_cluster/local/inputs.conf
[splunktcp://9997]
Note: Splunk is replacing master-apps with manager-apps in their latest releases. If you decide to use manager-apps, keep all the configurations in one place and cannot be placed between these two locations.
5.1.2 server.conf
Add the following in server.conf at the Cluster Manager to setup the indexer discovery.
vi $SPLUNK_HOME/etc/system/local/server.conf

[indexer_discovery]
pass4SymmKey = IndexDiscoveryKey
5.1.3 outputs.conf
Create a new file named outputs.conf with the following contents to disable indexing on the Manager node and to forward the log data to the indexers.
Using indexer discovery using which CM and Search Head can automatically forward data to the local indexers and in case of indexer failure, will forward to the remote indexers.
vi $SPLUNK_HOME/etc/system/local/outputs.conf

# Turn off indexing on the Cluster Manager  & Search Heads
[indexer_discovery:master]
pass4SymmKey = IndexDiscoveryKey
master_uri = https://splunk-cm01:8089

[tcpout]
defaultGroup=peer_nodes
indexAndForward=false
forwardedindex.filter.disable=true
disabled=false

[tcpout:peer_nodes]
autoLBFrequency = 60
indexerDiscovery=master
#useACK = true
forceTimebasedAutoLB = true
Copy the above file (outputs.conf) on splunk-sh01 (Search Head) server as well as we wanted them to disable the indexing functionality on those instances and forward logs to Indexers.
[root@splunk-cm01 ~]# clush -g sh -c /s01/splunk/etc/system/local/outputs.conf --dest /s01/splunk/etc/system/local/5.1.4 indexes.conf
Create a new file named indexes.conf under $SPLUNK_HOME/etc/master-apps/_cluster/local directory with the following contents.
Note: Please replace the remote.s3.endpoint value with the FlashBlade’s data VIP and not the management IP.
vi $SPLUNK_HOME/etc/master-apps/_cluster/local/indexes.conf

[default]
maxDataSize = auto
# 750 MB to roll from Hot to Warm
frozenTimePeriodInSecs = 7776000
# 90 days to roll off of Cold

remotePath = volume:remote_store/$_index_name
# Enabling SmartStore globally
repFactor = auto

[volume:cache]
path = /cache/splunk
#maxVolumeDataSizeMB = 1000000
# 1TB

[volume:remote_store]
storageType = remote
path = s3://splunk-data
# The following S3 settings are required only if you’re using the access and secret
# keys. They are not needed if you are using AWS IAM roles.
remote.s3.access_key = <access key of the account that holds the bucket>
remote.s3.secret_key = <secret key of the account that holds the bucket>
remote.s3.endpoint = http://<FlashBlade-data-vip>
remote.s3.supports_versioning=false
remote.s3.list_objects_version=v2

# Index definitions
[apache-pure1]
remotePath = volume:remote_store/$_index_name
homePath = volume:cache/$_index_name/db
coldPath = volume:cache/$_index_name/colddb
thawedPath = $SPLUNK_DB/$_index_name/thaweddb
repFactor = auto
5.2 Enable Indexer Clustering
5.2.1 Setup the Cluster Manager
Enable the indexer cluster by configuring the Cluster Manager node with replication factor as 2 and search factor as 2. Make sure to preserve the secret as that would be needed if you wanted to add additional peer nodes down the line.
[root@splunk-cm01 ~]# splunk edit cluster-config -mode master -replication_factor 2 -search_factor 2 -secret PureSplunk -cluster_label pure -auth admin:splunk123

The cluster-config property has been edited.
You need to restart the Splunk Server (splunkd) for your changes to take effect.
[root@splunk-cm01 ~]# splunk restart
Note: Splunk in its latest release, has changed the mode from master to manager. Similarly the mode slave has been changed to peer.
5.2.2 Configure the Peer nodes
Perform the following command from the Cluster Manager which runs the following command on each peer nodes (splunk-ix01 – splunk-ix04) and restarts them.
[root@splunk-cm01 ~]# clush -g ix /s01/splunk/bin/splunk edit cluster-config -mode slave -manager_uri https://splunk-cm01:8089 -replication_port 9887 -secret PureSplunk -auth admin:splunk123

[root@splunk-cm01 ~]# clush -g ix /s01/splunk/bin/splunk restart
5.2.3 Configure Search Head
Run the following command from the Cluster Manager which runs the command on the search head (splunk-sh01) server and restarts Splunk.
[root@splunk-cm01 ~]# clush -g sh /s01/splunk/bin/splunk edit cluster-config -mode searchhead -manager_uri https://splunk-cm01:8089 -secret PureSplunk -auth admin:splunk123

[root@splunk-cm01 ~]# clush -g sh /s01/splunk/bin/splunk restart
5.3 Setup Distributed Monitoring Console (DMC)
5.3.1 Setup Distributed Monitoring Console (DMC)
Connect to the Splunk Admin (splunk-cm01) web console and click Settings -> Monitoring Console

Settings -> General Setup

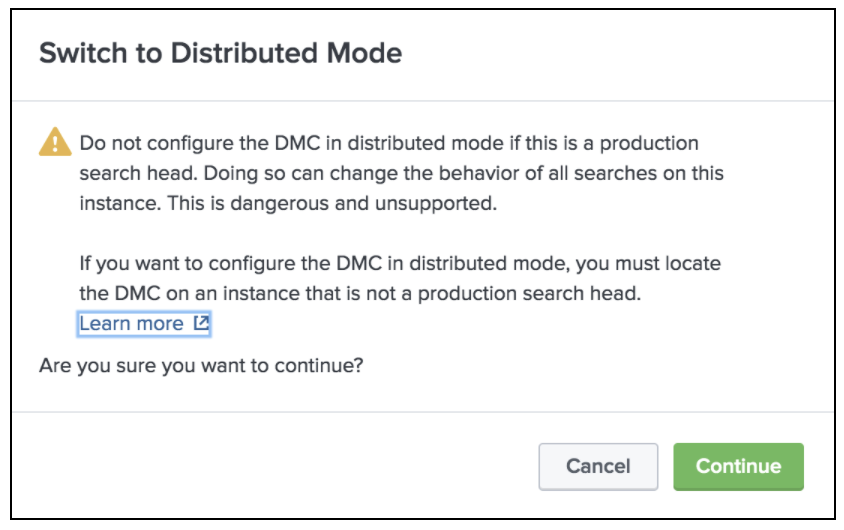
Switch to Distributed Mode from Standalone mode

Click Continue (unless you are running this from the Search Head or Indexers)
Click Edit against splunk-cm01 and select Edit Server Roles.
Keep “License Master” and “Cluster Master”

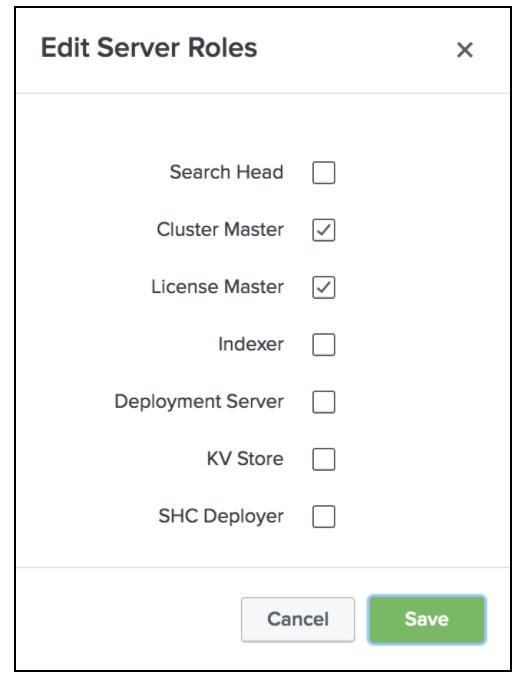
Similarly edit the Server Roles for all the indexers under the Remote Instances and check only the Indexer and uncheck KV Store.
Save the changes by clicking the Apply Changes button.


Click Apply Changes and Refresh.
The “Monitoring” column across all Indexers and Search Heads should now show “Enabled”.
Now clicking the “Overview” tab should show the overall status of all components.
5.3.2 Configure Distributed Search
Enabled Distributed search from the Cluster Manager by going through Settings => Distributed Environment => Distributed Search.

Within the Distributed Search page, click Search Peers

Click New Search Peer button on the top right corner

Provide the Search Head URI, credentials and click Save. Repeat this for all the search heads (in case if you are using more than one search head).

Go to Settings => Monitoring Console and within the Console page, select Settings => General Setup.
The newly added search head should be listed under “Remote Instances” as New.
Edit the Server Role of the search head and ensure the roles Search Head and KV Store are selected. Click Apply Changes and confirm the changes are applied successfully.
6 Miscellaneous Activities
6.1 Making configuration changes
In an indexer cluster setup, you should always update any changes to indexes.conf on the Cluster Manager and not directly update the indexes.conf on the indexers.
Once you have made the changes, use the following command to push the changes to all the indexers.
[root@splunk-cm01 ~]# splunk apply cluster-bundle -auth admin:splunk1236.2 Splunk SmartStore validation
Before performing step 5.2 (Indexer Cluster setup), make sure you can access the S3 bucket created on the FlashBlade using the data VIP and the access/secret keys. You can avoid a lot of headache if these are validated up front. If not you might be running into HTTP 502 and other errors.
You can use the following post to perform the validation of the S3 bucket.

